As a homesteader, I grow most of our vegetables, herbs, and fruits. I also raise chickens and ducks for eggs and keep goats for dairy. But until a few years ago, I still bought most of my spices. Since I use tons of spices when cooking and making ferments, that meant I still had a pretty hefty grocery bill.
So, spice by spice, I’ve started growing all of my favorites. You can do this at home too, even if you have a small garden.
Mustard, for example, is one of the best spices to get started with because it’s such a prolific producer of seeds. Four plants can get you a pint jar full of seeds for your spice rack with extras to plant as your next crop. Plus, you can also harvest some of the leaves to eat too!
Growing Mustard For Seed

There are three main types of mustard grown for seed. White mustard seed is what’s used to make the cheap grocery store condiment. Black mustard is mainly grown for making the delicious mustard oil that gives curry dishes distinctive richness. Seeds for these mustard types are usually sold by industrial farm seed suppliers.
Or… you can use the leaf mustard already growing in your potager for spice seeds. Those classic heirloom varieties like Old Fashioned, Florida Broadleaf, and Southern Giant are also spectacular seed makers.
The seeds they produce come in varying shades of brown. They are terrific for making your own fermented mustard condiments at home. Plus, they add amazing flavor when sauteed in butter and used in curries or stews. They can also be pressed for oil if you have space to grow a lot of plants.
Planting Mustard

In my USDA Zone 7a climate, I cast out my seeds in compost rich beds in my potager garden in late fall. Then I let the plants germinate whenever they want. Some start as early as December, others wait until February. Their irregular germination in cold temperatures is wonderful because it means I get a continuous supply of new mustard plants emerging all winter long.
If we have a freezing weather run in the forecast, I harvest the leaves of my mature mustard plants to back to the head and eat them. Most of the time, the roots survive the cold and the leaves grow back once the weather warms up. Sometimes, the plants die. But others eventually emerge to fill in gaps.
In colder climates, you may need to plant in spring or grow your winter mustard in cold frames or hoop houses. But, you can still get a good crop for seeds in about 4 months.
Setting Seeds

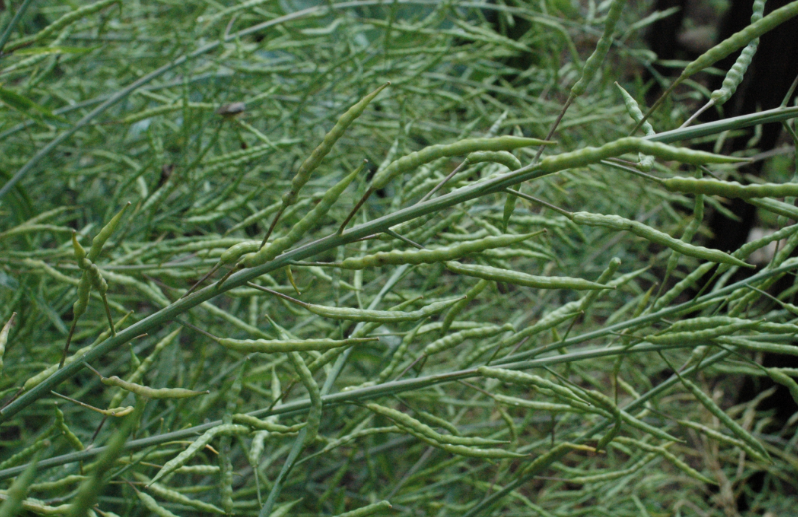
As we move to warmer weather, I stop harvesting greens from my healthiest, hardiest plants to let them grow large for seed production. Generally my plants get about 5-6 feet tall. They put up stunning yellow flowers early in spring and are abuzz with plentiful pollinators on sunny days.
Tying Stems

Once the plants start to form seed pods, the stems get heavy and are susceptible to falling over. So, I tie the seed stems together like a tree to make them self-supporting.
Drying Seed Heads
I let my seed pods dry on the plants. Some pods will inevitably shatter and self sow before I harvest the pods which I love! When those spilled seeds grow into baby mustard greens, I harvest them for salads or add them to soups. Even the roots are delicious when plants are under 3 inches tall. So, you can just pull, wash, and eat the whole little plant.
Note: If you don’t want your seeds to self-sow, or you need your garden space sooner, remove the seed heads when they start to be a little papery. Then, dry them indoors in paper bags.
Threshing and Winnowing

Once the heads are completely dry, I cut them from the plant.

Then, I fold them into an old sheet or other kind of fabric.

If you are a barefoot gardener like me, go ahead and stomp on the sheet with bare feet to thresh the seeds from their pods. Or do it in your socks if the soles of your feet are tender.

When you’ve flattened the seed roll, open the sheet and pick out all the big stem parts. You can give all those plant parts to your chickens to glean all the extra mustard seeds as tasty treats. They also munch on any pests, like harlequin bugs, that might be on the stems.
You can also throw all that plant matter onto a pollinator plot. Any leftover seeds will germinate and provide early spring forage for your birds and bees. The dried stems will also provide shelter for over-wintering insects.

Shake the seeds together and transfer them into a mustard seed sized sieve.

Shake the seeds through the sieve into a container below. Throw the chaff left in the sieve wherever you put those stems.

As a final step, lift the seeds and let them fall back in the bowl. As they do, a gentle breeze whisks away the small light bits of chaff that passed through the sieve. See those little white pieces flying away in the photo above? If there is no breeze, use a fan on a low setting or use a paper fan in your other hand.
The end product isn’t perfectly chaff free. But it’s pretty clean. Also, when you make condiments or cook with your seeds, you’ll get another chance to remove any chaff bits that bother you.
More Tips
To keep this task from being tedious, I usually process four plants at at time. It takes about 10 minutes and nets at least a pint of delicious mustard seeds.
Also, since those plants were my biggest and best, those spice seeds can also be planted in the garden. (Don’t try that with store bought mustard seeds unless it’s an emergency.)
If you want more detailed instructions on how to grow and use mustard, check out my related post at The Grow Network. Also, if you want to learn more about producing spices at home, check out my book Grow Your Own Spices for more information.
Epicurean Living

If you’d like to receive a free copy of my first issue of Epicuren Living, an electronic chapbook filled with Epicurean philosophy and related ideas on gardening, homesteading, creativity, and ecology, enter your email address below for a link.
I’d also appreciate if you would share this blog post with anyone you think might also want a free copy of Epicurean Living too. Thanks for reading and sharing!

Leave a Reply