The garden explosion happened. Those tiny, seedlings I showed pictures of in the last post Plant Your Homestead Potager suddenly started to look like fully-fledged plants.
Even when you visit your garden daily, and observe the incremental growth, there is still this moment when you realize “Wow, this is a real garden.”
Honestly, it was a real garden from the first moment you poured your intentions into it. Yet, it always seems so surprising when your effort starts to pay off and your aesthetic ideals of a garden are gratified.
Stop and enjoy this moment. Savor it like you would a perfect, but fleeting sunset. Take some mental, or actual pictures, to refer back to from year to year. Then, get out your harvest basket and scissors and get to work.
Harvesting as Health Care for Your Garden

This is the point in time when you really have to be diligent. If you don’t stay on top of your harvesting and garden care, your plants’ heath will decline quickly.
So-called “pests” will come to help eradicate failing plants. We call them pests, but really they are just nature’s helpers, culling the poor performers so they don’t go to seed and start generations of weak plants.
As plants fail, the biological life in your soil will lose their sense of purpose. Those damaged plants begin to process nutrients poorly, leaving too much behind in the soil. . Those once eager biological workers start to go dormant from boredom as the nutrients they provide begin pile up and their efforts go unappreciated by dying root systems.
Don’t worry. This does not need to be the fate of your garden.
All you need to do is harvest and replenish what you take. Then, you’ll have a continuous supply of fresh food. Your soil life will be busy and satisfied. Your plants will be healthy and you won’t need the services of nature’s pest-like plant killers who offer a quick end to suffering plants.
The Continuous Harvest

If you took my advice and over seeded, you can use your scissors to cut out the extra plants that are smaller in size. Leave the largest, healthiest plants in the ground to grow out to maturity.
The Art of Thinning
If all those extra plants with edible greens look healthy, and aren’t developing slug problems, I thin in increments. That way I get a harvest of baby greens every day for a week or two. Even a small handful of fresh tasty greens can spruce up an omelet, make a great side salad, or be tossed with olive oil and salt when you need something salty and crunchy on warm days.
– Warning
If plants show signs of insect damage or leaf discoloration, then I thin brutally, leaving only those plants that have the best chance of success. Heavy rains followed by periods of hot, sunny days can create fungal problems and encourage slugs to move in. So, when that happens, I also speed up my thinning process to maintain good air circulation and avoid creating a slug heaven.
– Minimally Thinned Root Vegetables
Most plants ultimately need plenty of space to grow to mature size. However, there are a few that can grow to a large size even in close contact with fellow plants. For example, beets, turnips, and radish can grow in groups of 3-4, almost right on top of each other in fertile soil.
The bulb portions of the plants just push each other apart as they swell. Then, you can carefully harvest the biggest of the bulbs and let the others continue growing. You do need good airflow around your clusters though. So, you will still need to thin many of the greens for good root production.
– Non-Edible Plant Thinning
Even for plants that I can’t eat the thinnings of, like tomatoes and peppers, I still thin incrementally. High-performing, young plants really seem to benefit from a little competition and companionship at the outset of planting.
This method requires is a delicate balance though because once the strongest plants are established, they can become stunted by crowding. Usually within 2-3 weeks in warm weather and 3-4 weeks in cool weather, it’s time to let your winners make the rest of their journey toward plant maturity on their own.
Leave Non-eDible Roots In Place
As I’ve mentioned in other posts, bacteria and fungi form relationships with plant roots. So, if you rip out your plant roots every time you harvest, you end up taking a lot of those amazing garden helpers with you.
Instead, leave the roots in the ground when you can. Small roots decompose quickly. Even large roots can be left to decompose if you have room to plant around them.
If your plants have become pest infested, though, you’ll want to pull those roots out and throw them away so that you don’t run the risk of harboring lots of larva in your soil and plant matter.
Here’s an example of my kohlrabi seedlings before thinning.

Now, here’s what it looked like after I harvested the baby greens to use for making a variation on Palak Paneer. I only left the two largest plants on the outer edges of the photo so that they can continue to grow to maturity. The rest were dinner and delicious!

Fertilizing
If you need another application of organic fertilizer for your heavy feeders, then you can do this after you complete your thinning process.
When using slow-release, meal-based fertilizers like feather meal and bone meal, or organic 4-4-4 mixes, you can sprinkle them directly on the soil all around your plants. I like to cover them with a thin layer of compost and then water them in to help them start to penetrate the soil.
When you eventually harvest your mature plants, you’ll also want to fertilize the bed again before you start a new crop. Then, you’re all set to start growing your next crop.
Succession Planting
As you finish harvesting your cool season crops, you’ll most likely want to put in warm season crops. For example, if your March planted peas are spent, then it might be time for your late-May planted green beans. When cabbage comes out, okra might go in.
If you are removing warm season crops, it may be time to start planting for a fall harvest. Fall gardening really starts in summer. This is usually around late July through mid-August. But the exact timing for fall planting depends on your climate and growing season.
Your fall plants need to be well-established before your day-length shortens too much and soil temperatures cool. Winter cover crops are generally started around this time too.
If it’s not quite fall planting time, you may need to grow a short term, hot season cover crop like buckwheat or cowpeas. The important thing is never to leave your beds unplanted.
I often put my new seeds in the ground a few days before I harvest the entire mature plant (e.g. cabbage heads). That gives the seeds time to acclimate and activate. Once I remove the ready to harvest plants, those eager seeds seem to sprout instantly.
Note, this only works if you can leave the mature plant roots in the ground. You don’t want to disturb newly planted seeds by pulling out old roots.
Come and Cut Greens

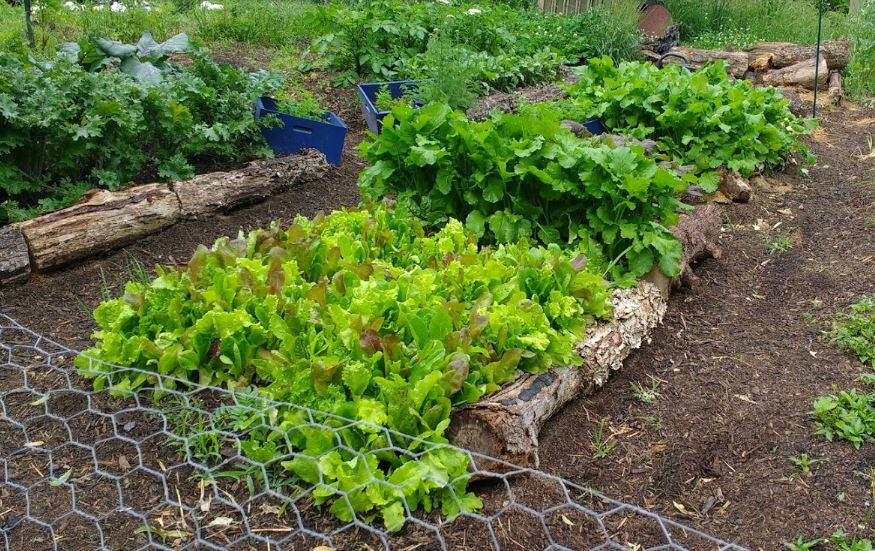
For densely planted come and cut greens, like the lettuce bed shown above, I harvest in sections. This promotes good air flow and keeps the bed looking full even after I fill my salad bowl.
You want to leave at least an inch of leaf producing part of each plant so that the lettuce leaves can regrow from the base. Many of your lettuce plants will actually make multiple heads and start to become more productive as you harvest them.

Once that happens, you’ll be able to harvest a section of your bed almost daily . Then, a week later when you’re ready to re-harvest that first section, it will be lush and ready to cut again.
If your plants start to bolt (send up flower stalks), you need to harvest them all the way to the soil at each cutting to kill those plant and make room for more. Right after you cut a bolting section down, add some more fertilizer to the soil and cover with 1-2 inches of compost. Then, re-seed your next round of lettuce right over your just butchered patch.
If you do this in segments, your garden bed will never be completely bare while waiting for new seedlings to sprout. When you get your timing exactly right, then you never want for lettuce.
In hot climates, your second planting may need to be a collection of oak leaf lettuces or alternative greens like New Zealand spinach that better tolerate excessive heat.
Salad Preparation Tip

Cut your lettuce up into bite size portions and put them directly in your salad spinner in the garden. Then, all you need to do is give them a rinse and spin back in the house and they are ready to eat.
Slug Tip
Also, if you do have issues with slugs, they tend to be heaviest in the bottom inch or two of the cut leaves.By trimming that area and throwing it on top of your compost pile to dry out in the sun, you remove the slugs from your lettuce bed and have fewer pests to wash out of your cut lettuce.
Conclusion

Your timing and efficiency at harvesting vegetables from your potager will get better the more you do it. Take notes on what works and what doesn’t. Visualize ways that you’ll improve your process for next year as you go along, even if it’s too late to correct things this year.
In my experience, the best time to plan your garden for next year is actually right now while you are in the thick of the growing season. You may not formalize your plan until winter when you have time to sit down and write it out. But, by solving challenges and making plans for your future garden now, and keeping good notes so you remember, your work will be mostly done before you put your future plantings on paper.
Next time, we’ll start to get into the details of making compost right in the garden. In the meantime…Bon Appétit!

Leave a Reply